
INSTALLATION STEPSDownload the Installation Package
Install the Cortex XDR Agent package
Verify the installation
Reboot your MacOS device
Before installing the Cortex XDR agent on a Mac endpoint, verify that the system meets the requirements described in Cortex XDR for Mac Requirements.
Download the installation package.Software installation packages will be provided from your account activation email and by signing into your account @exosecure.com from your order/subscription details.
Install the Cortex XDR agent Package.
-
-
Run the Cortex xdr.pkg installation file.

- Click Continue to proceed with the installation.
- If prompted to confirm the destination, click Continue.
- Click Install to begin the installation.
- Enter the User Name and Password of the administrator with access to install software on the endpoint, and then click Install Software .
-
NOTE: ( macOS 10.13 (High Sierra) and later versions) Allow Cortex XDR to install system extensions:
-
Dismiss the System Extension Blocked warning
-
Go to System Preferences Security & Privacy General and select Allow.

-
-
- The Cortex XDR agent logs any installation errors to /var/logs/installation.log. If installation fails for any reason, you can view this log to better understand the cause of the installation failure.
Verify the installation
-
-
After the installation completes, verify your connection.
- To open the Cortex XDR agent console, click the agent icon in the menu bar, and select Open Console.
-
Click Check In Now to initiate a connection with your tenant of Cortex XDR. If successful, the Last Check-In field updates to display the recent check-in date and time.
-
 If the Cortex XDR agent does not connect to Cortex XDR, verify your internet connection and perform a check-in on the endpoint.
 -
NOTE: (macOS 10.15 (Catalina) and later versions ) Grant full disk access.
Due to changes in the security settings of macOS 10.15, you must allow the Cortex XDR agent full disk access on your endpoint to enable full protection. If you do not authorize the agent full disk access on your endpoint, the agent provides only partial protection of files in the/Applications directory. The first time the agent detects an attempt to run an executable file located in another protected location on the endpoint as part of the anti-malware flow, macOS will deny the Cortex XDR agent access and prompts the user to grant full disk access. To grant the Cortex XDR agent full disk access locally on the endpoint:
- Go to System Preferences > Security & Privacy tab, and select Full Disk Access.
- To make changes, click lock icon (
 ) on the bottom left, enter your credentials, and Unlock.
 - Navigate to Macintosh HD Library Application Support PaloAltoNetworks Traps bin.
-
Select trapsd, authorized, and pmd.
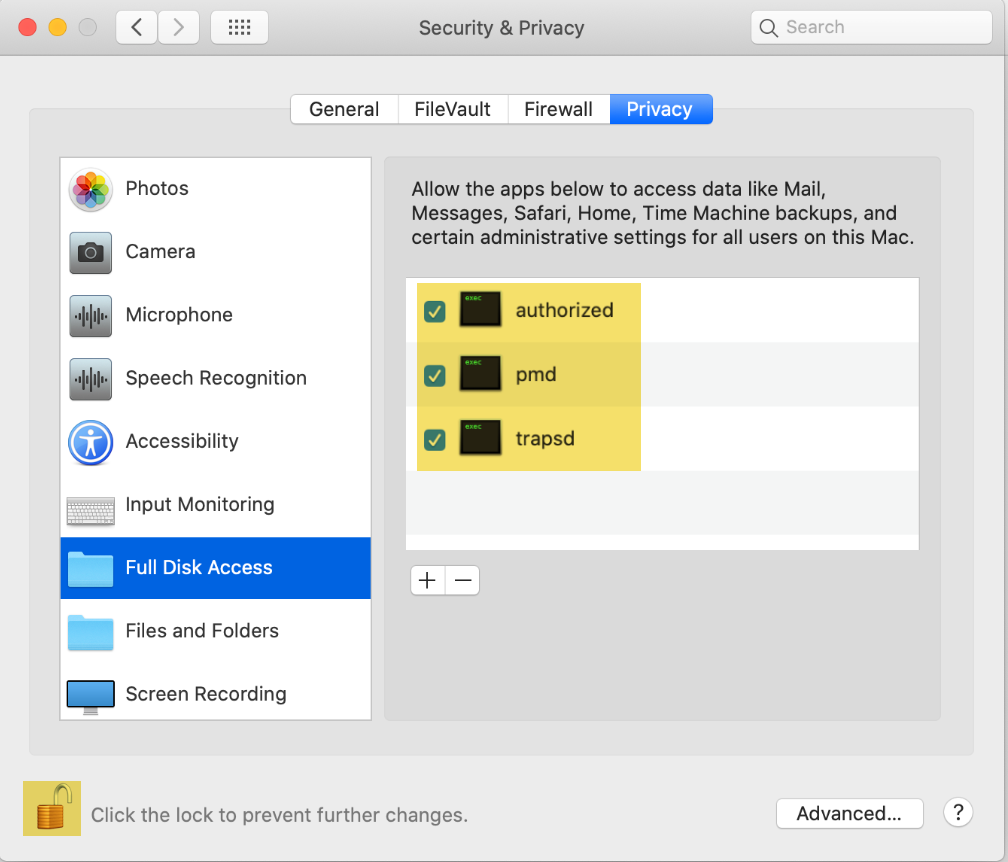
- When you’re done, click
 to save your changes and stop editing.
-
Reboot your MacOS device